Spring Boot – Creating a Data Repository for MongoDB
Preamble
Now that we’ve seen how to create a rest controller with Spring Boot and address it with Postman, should we think about how to store the data in the system? There are many ways and ways to store data. The classic variant would be to use a SQL database like MariaDB. I want to show you in my tutorial how you can use Spring Boot Repository classes to store data in a MongoDB.
Since we want to use a MongoDB we also need a MongoDB instance. For this you have two possibilities.
- You install a MongoDB on your system. You can download the binaries here
- You are using a docker container with a MongoDB, how to do that I show you here in my tutorial MongoDB with Docker
Requirement
- Existing Java 8 Installation
- Existing Maven 3 Installation
- Existing MongoDB Installation on Port 2017
- Basic knowledge of REST
- Tutorial: Spring Boot Rest Controller
Include Spring Boot Data for MongoDB
Extending Maven pom.xml
So that our application can establish a connection with the MongoDB, we have to extend our POM from the tutorial Spring Boot Rest Controller by another Spring Boot dependency.
<dependency>
  <groupId>org.springframework.data</groupId>
  <artifactId>spring-data-mongodb</artifactId>
</dependency>
The above dependency integrates the Spring Data MongoDB libraries into our project.
The following code block shows the extended POM:
<project xmlns="http://maven.apache.org/POM/4.0.0" xmlns:xsi="http://www.w3.org/2001/XMLSchema-instance"
         xsi:schemaLocation="http://maven.apache.org/POM/4.0.0 http://maven.apache.org/maven-v4_0_0.xsd">
  <modelVersion>4.0.0</modelVersion>
  <groupId>de.ertantoker.tutorial</groupId>
  <artifactId>spring-boot-with-maven</artifactId>
  <packaging>jar</packaging>
  <version>1.0-SNAPSHOT</version>
  <name>spring-boot-with-maven</name>
  <url>http://maven.apache.org</url>

  <parent>
    <groupId>org.springframework.boot</groupId>
    <artifactId>spring-boot-starter-parent</artifactId>
    <version>2.0.1.RELEASE</version>
  </parent>

  <properties>
    <java.version>1.8</java.version>
  </properties>

  <dependencies>
    <dependency>
      <groupId>org.springframework.boot</groupId>
      <artifactId>spring-boot-starter-web</artifactId>
    </dependency>

    <dependency>
      <groupId>org.springframework.data</groupId>
      <artifactId>spring-data-mongodb</artifactId>
    </dependency>

    <dependency>
      <groupId>junit</groupId>
      <artifactId>junit</artifactId>
      <version>3.8.1</version>
      <scope>test</scope>
    </dependency>
  </dependencies>

  <build>
    <plugins>
      <plugin>
        <groupId>org.springframework.boot</groupId>
        <artifactId>spring-boot-maven-plugin</artifactId>
      </plugin>
    </plugins>
  </build>
</project>
Enable Spring Boot Data
As a further step after we have included dependency, we have to add a configuration file to our application. The central configuration file for Spring Boot applications is the application.properties or application.yml. The only difference between the two configuration files is that the application.properties is a classic Key/Value file and the application.yml is a YAML file. In my tutorials I will always use the YAML variant.
In order to create an application.yml we first have to add a directory to our project! Maven projects offer us the possibility to store our configuration files in the directory „PROJEKT_HOME/src/main/resources“.

Next we have to tell our application under which URL the local MongoDB instance can be found. Therefore we add the following entry to the application.yml file.
spring:
  data:
    mongodb:
      uri: mongodb://localhost:27017/customerService
The complete YAMl file should look like this.
server:
  port: 8080

spring:
  application:
    name: customer-service
  data:
    mongodb:
      uri: mongodb://localhost:27017/customerService
Create Spring Boot Data Repository Interface
Now we have finished the configuration. Now it’s time to create our first repository interface. Repositories in Spring Boot are Java interfaces that inherit from the interface „MongoRepository<T, ID>“. Spring Data is structured in such a way that the most common access methods are already implemented through the repository interface classes. This means less development effort for CRUD functionalities for the developer. The developer can focus on the business logic all by himself.
The following code example shows our CustomerRepository.java Interface
package de.ertantoker.tutorial;

import org.springframework.data.mongodb.repository.MongoRepository;

public interface CustomerRepository extends MongoRepository<Customer, String> {
}
Now we would be finished with the database access layer as well. How to extend the repository classes with more methods, I will show in another tutorial, which will be dedicated only to Spring Data.
Spring Boot Data MongoDB Model Class
In the next step we have to extend our model class. The model class must be extended by two annotations.
The following codeblock shows the extended model class:
package de.ertantoker.tutorial;

import org.springframework.data.annotation.Id;
import org.springframework.data.mongodb.core.mapping.Document;

@Document
public class Customer {

    @Id
    private String id;
    private String firstname;
    private String lastname;

    public String getId() {
        return id;
    }

    public void setId(String id) {
        this.id = id;
    }

    public String getFirstname() {
        return firstname;
    }

    public void setFirstname(String firstname) {
        this.firstname = firstname;
    }

    public String getLastname() {
        return lastname;
    }

    public void setLastname(String lastname) {
        this.lastname = lastname;
    }
}
Extending Spring Boot RestController
Now that we have extended the Model class, we will inject our Repository class into our existing CustomerController. For this we will use the constructor Injection from Spring. This means that we add a private CustomerResporitoy customerRepository property to the CustomerController.java class and then initialize it using the constructor.
The following code block shows the new implementation of the CustomerController.
package de.ertantoker.tutorial;

import org.springframework.http.HttpStatus;
import org.springframework.http.ResponseEntity;
import org.springframework.web.bind.annotation.*;

import java.util.List;

@RestController
@RequestMapping("/customers")
public class CustomerController {

    private CustomerRepository customerRepository;

    public CustomerController(CustomerRepository customerRepository) {
        this.customerRepository = customerRepository;
    }

    @GetMapping
    public ResponseEntity<List> getCustomers() {
        return new ResponseEntity<>(customerRepository.findAll(), HttpStatus.OK);
    }

    @PostMapping
    public ResponseEntity createCustomer(@RequestBody Customer customer) {
        Customer savedCustomer = customerRepository.save(customer);
        return new ResponseEntity<>(savedCustomer, HttpStatus.CREATED);
    }

    @GetMapping("/{id}")
    public ResponseEntity getCustomerById(@PathVariable String id) {
        return customerRepository.findById(id)
                .map(customer -> new ResponseEntity<>(customer, HttpStatus.OK))
                .orElseGet(() -> new ResponseEntity<>(HttpStatus.NOT_FOUND));
    }
}
Test Spring Boot Data Project
Now we start Postman and send the following POST request.
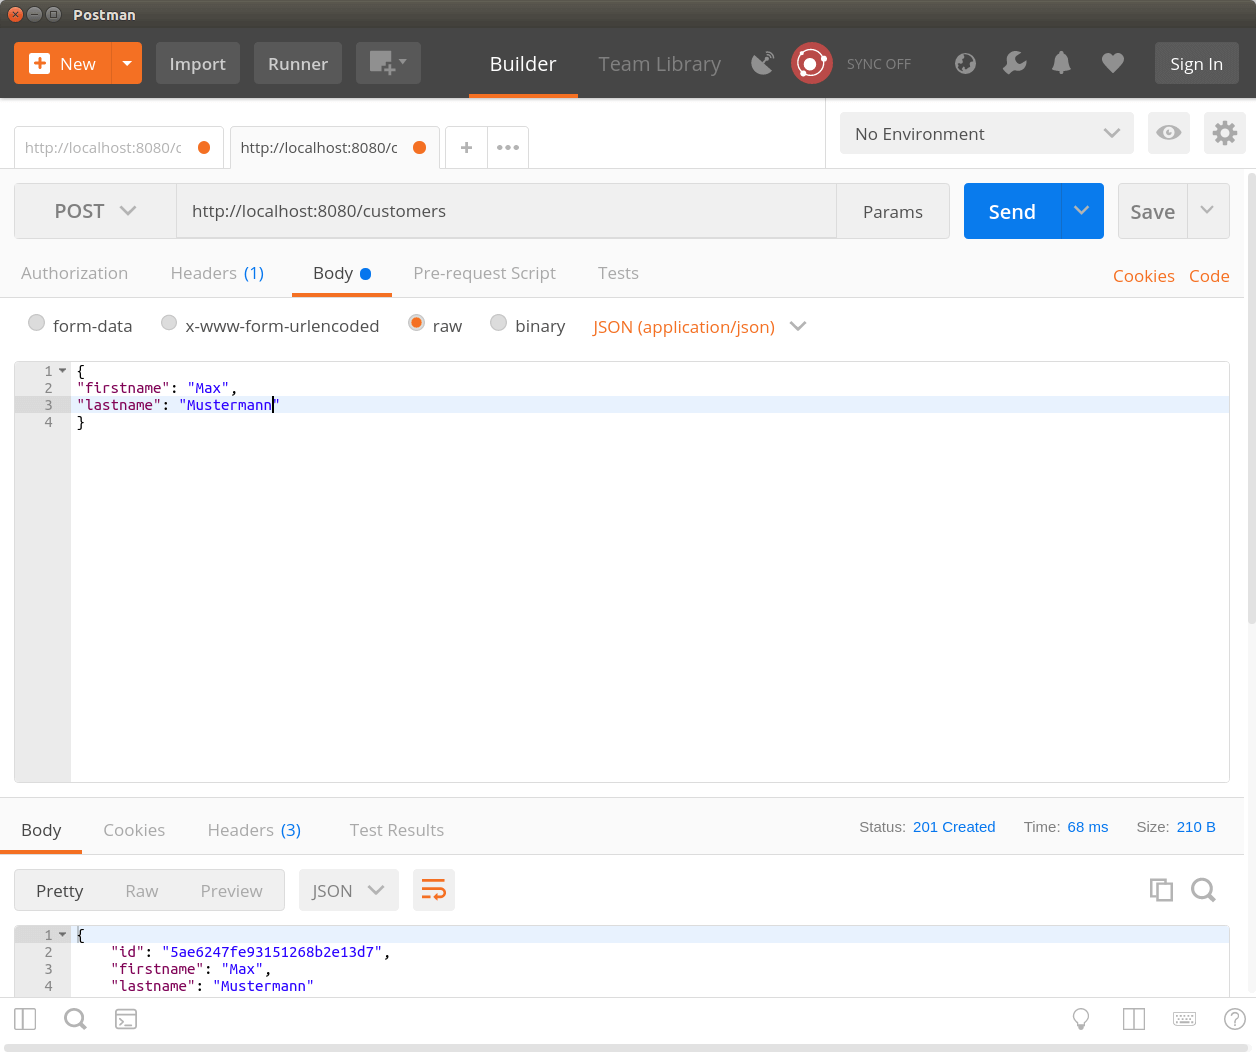
We see our mail request was answered with a CREATED from the server. This means that the customer has been saved in the MongoDB. To check this we now call the following GET URL: http://localhost:8080/customers. You can see the result as follows.
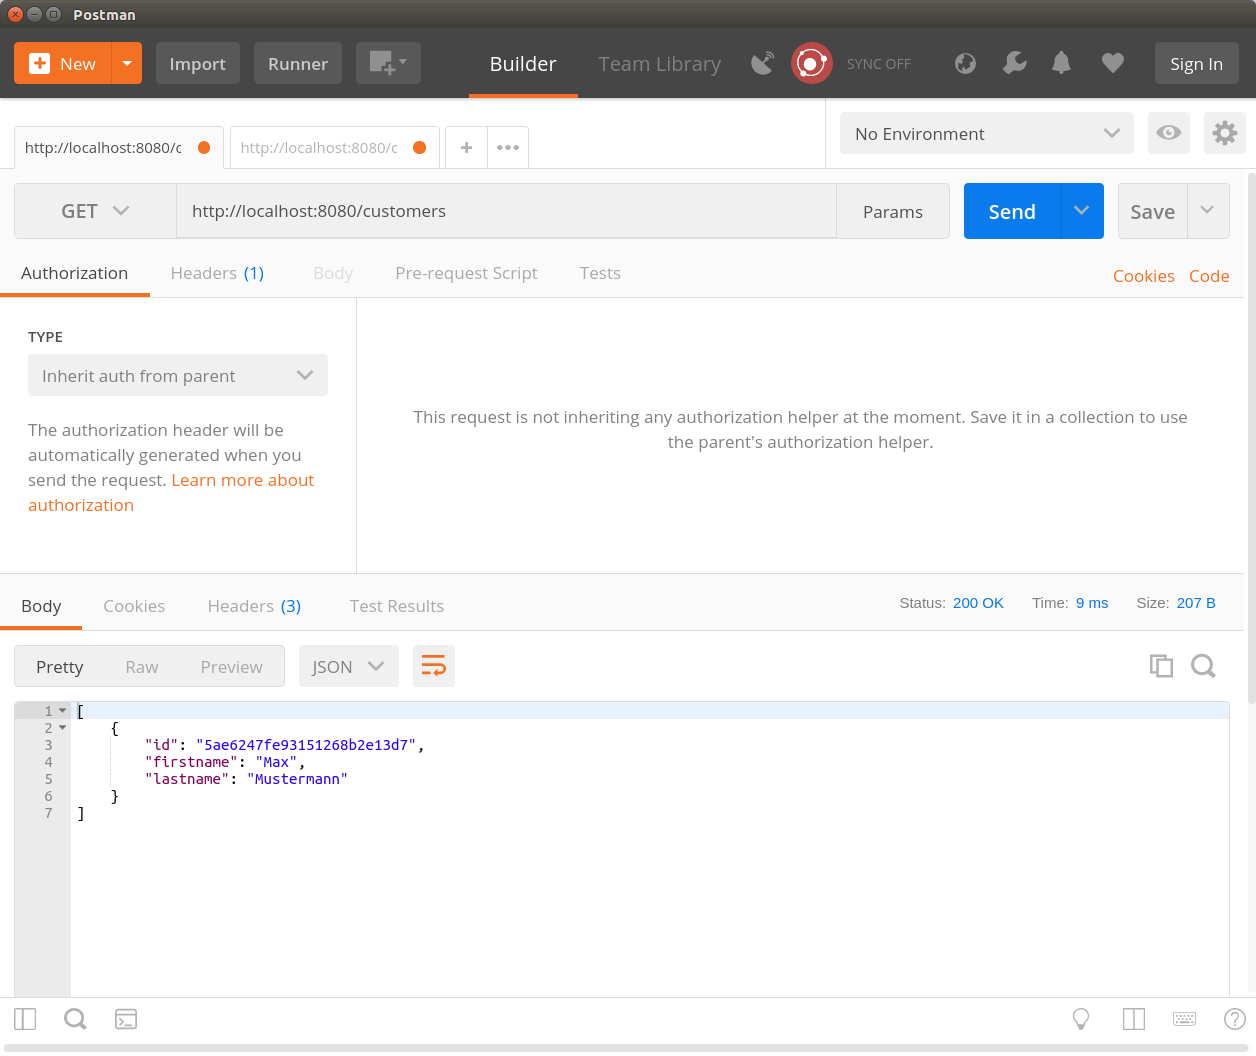
We see with the result of the POST call the same Id as with the GET call. Thus it concerns the same objects. Finally we risk a look into the MongoDB. Here we see that Spring Data has added a „_id“ and a „class“ to the data stored.

The result
In this tutorial we saw how to create a repository class to store data in a MongoDB. We have also seen how to extend an existing Spring Rest Controller to use a repository class. With this knowledge you can now build more Spring Boot Microservices.
I hope you enjoyed my tutorial. I would be pleased about criticism, suggestions and suggestions. If you have a special question, just write a comment below.