Spring Boot – Create RestController with Spring Boot
Preamble
In the last tutorial we learned how to create applications with Spring Boot and Apache Maven in a very short time. This tutorial is about creating a rest controller with Spring Boot. We will learn how to create a rest controller and how to offer different HTTP methods (GET, POST).
Requirement
- Existing Java 8 installation
- Existing Maven 3 Installation
- Basic knowledge of REST
- Tutorial: Spring Boot Projects with Maven
Create Spring Boot RestController Project
RestController are Java classes in the Spring Boot environment, which are enriched with special annotations. To declare a simple Java class as a RestController it is sufficient that the class is noted with „@RestController„.
Activate RestController
The following code block shows a simple RestController:
package de.ertantoker.tutorial;

import org.springframework.web.bind.annotation.RestController;

@RestController
public class CustomerController {
}
Now we have our first rest controller, unfortunately it can’t do much. The HTTP methods, which can be used as rest interfaces, are still missing. Spring Boot offers the possibility to enrich Java methods with the corresponding annotations, so that these are available as rest methods.
As an example we will now extend the CustomerController to implement the HTTP methods GET and POST!
In the context of Rest, GET methods are used for interfaces that return a resource. In our case we will implement two GET methods. The first GET method will return all customers as a JSON list. The second GET method will give us exactly one customer back. We will search the customer for his ID and return it. In this tutorial we intentionally do not use SQL or NoSQL database to keep the focus on the context rest.
Define RequestMapping
In order for a Rest Controller to be able to respond to HTTP requests at all, it is absolutely necessary to inform the Rest Controller under which URL it can be addressed. For this you have to add the annotation „@RequestMapping“ to the rest controller. In our case we extend the CustomerController which should be reachable via the URL http://localhost:8080/customers
package de.ertantoker.tutorial;

import org.springframework.web.bind.annotation.RestController;

@RestController
@RequestMapping("/customers")
public class CustomerController {
}
Get method for fetching object lists
Now our Rest Controller is one URL mapping richer, but it still can’t react to HTTP methods! To implement the first GET method we need a Java method that returns a list of customers as a return value. We have to extend this method with the annotation „@GetMapping“. By default, GetMapping takes over the mapping from the class without specifying a URL. This means that if we extend a method with @GetMapping, it can be reached at the URL http://localhost:8080/customers . The annotation @GetMapping can be passed as parameter a string, where further special URL specifications like path variables can be defined. In our case a simple @GetMapping is sufficient. In the second GET method I will explain how to define path variables.
Implement Get Method
package de.ertantoker.tutorial;

import org.springframework.http.ResponseEntity;
import org.springframework.web.bind.annotation.GetMapping;
import org.springframework.web.bind.annotation.RequestMapping;
import org.springframework.web.bind.annotation.RestController;

import java.util.List;

@RestController
@RequestMapping("/customers")
public class CustomerController {

    @GetMapping
    public ResponseEntity<List<Customer>> getCustomers() {
        return null;
    }
}
Now we have a GET method that gives us a list of customers back by interface definition, but we still need the implementation. For testing purposes we will now return customer objects here, which we will „store“ in a static list. This implementation is deliberately chosen because it will be changed later.
The following code block shows a simple implementation with the static list:
package de.ertantoker.tutorial;

import org.springframework.http.HttpStatus;
import org.springframework.http.ResponseEntity;
import org.springframework.web.bind.annotation.GetMapping;
import org.springframework.web.bind.annotation.RequestMapping;
import org.springframework.web.bind.annotation.RestController;

import java.util.ArrayList;
import java.util.List;

@RestController
@RequestMapping("/customers")
public class CustomerController {

    private static Integer customerId = 0;
    private static List<Customer> customers = new ArrayList<>();

    @GetMapping
    public ResponseEntity<List<Customer>> getCustomers() {

        Customer customer = new Customer();
        customer.setId(String.valueOf(customerId++));
        customer.setFirstname("Firstname " + customerId);
        customer.setLastname("Lastname " + customerId);

        customers.add(customer);

        return new ResponseEntity<>(customers, HttpStatus.OK);
    }
}
You may have wondered what the return line of the getCustomers() method does when inspecting the code block. Here we see that not a list of customers is returned directly, but a ResponseEntity object containing a list of customers and the HTTP status OK. By the return value via a ResponseEntity it is possible to return different HTTP states in the source code. With GET methods that have to search for data depending on request or path parameters, you can return a ResponseEntity with the HTTP status NOT_FOUND if a result is not found. More about this later in the second GET method.
Test Post Method
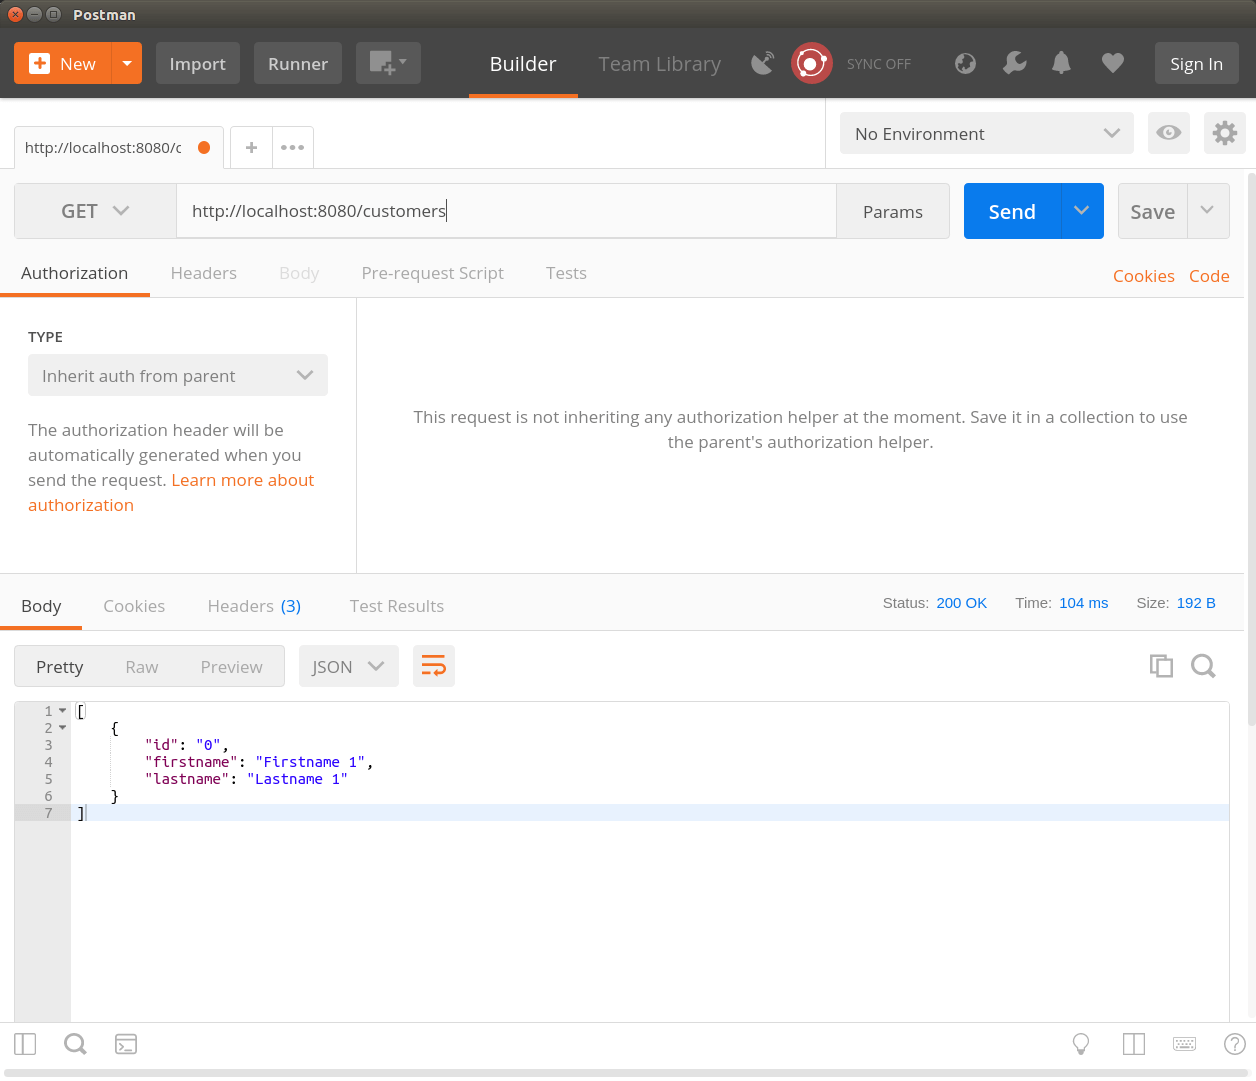
If we now call our RestController via Postman via the URL GET http://localhost:8080/customers, we see that a list of customers is returned to us. The HTTP status is OK in this case. At the second call we would have a second customer in the list.
Post method for creating an object
Now we have implemented our first GET method for our RestController. Now we should extend our RestController so that we can create new customers via the rest interface. Also here the static list serves as database replacement. In order to create resources or objects using the rest of the interfaces, we need a POST method that contains the object to be created in the request body. In our case it is a new customer that we want to create.
Implement Post Method
As already mentioned, we need a POST method. For this we have to extend or create a Java method with the annotation „@PostMapping“. As with GetMapping we will not pass a special URL definition as parameter of the PostMapping annotation. In this case, the mapping from the class is also used. As return value we will return the object which we have created via Post Method. The object is enriched with an ID when it is created and then returned.
package de.ertantoker.tutorial;

import org.springframework.http.HttpStatus;
import org.springframework.http.ResponseEntity;
import org.springframework.web.bind.annotation.*;

import java.util.ArrayList;
import java.util.List;

@RestController
@RequestMapping("/customers")
public class CustomerController {

    private static Integer customerId = 0;
    private static List<Customer> customers = new ArrayList<>();

    @GetMapping
    public ResponseEntity<List<Customer>> getCustomers() {
        return new ResponseEntity<>(customers, HttpStatus.OK);
    }

    @PostMapping
    public ResponseEntity<Customer> createCustomer(@RequestBody Customer customer) {
        customer.setId(String.valueOf(customerId++));
        customers.add(customer);
        return new ResponseEntity<>(customer, HttpStatus.CREATED);
    }
}
Test Post Method
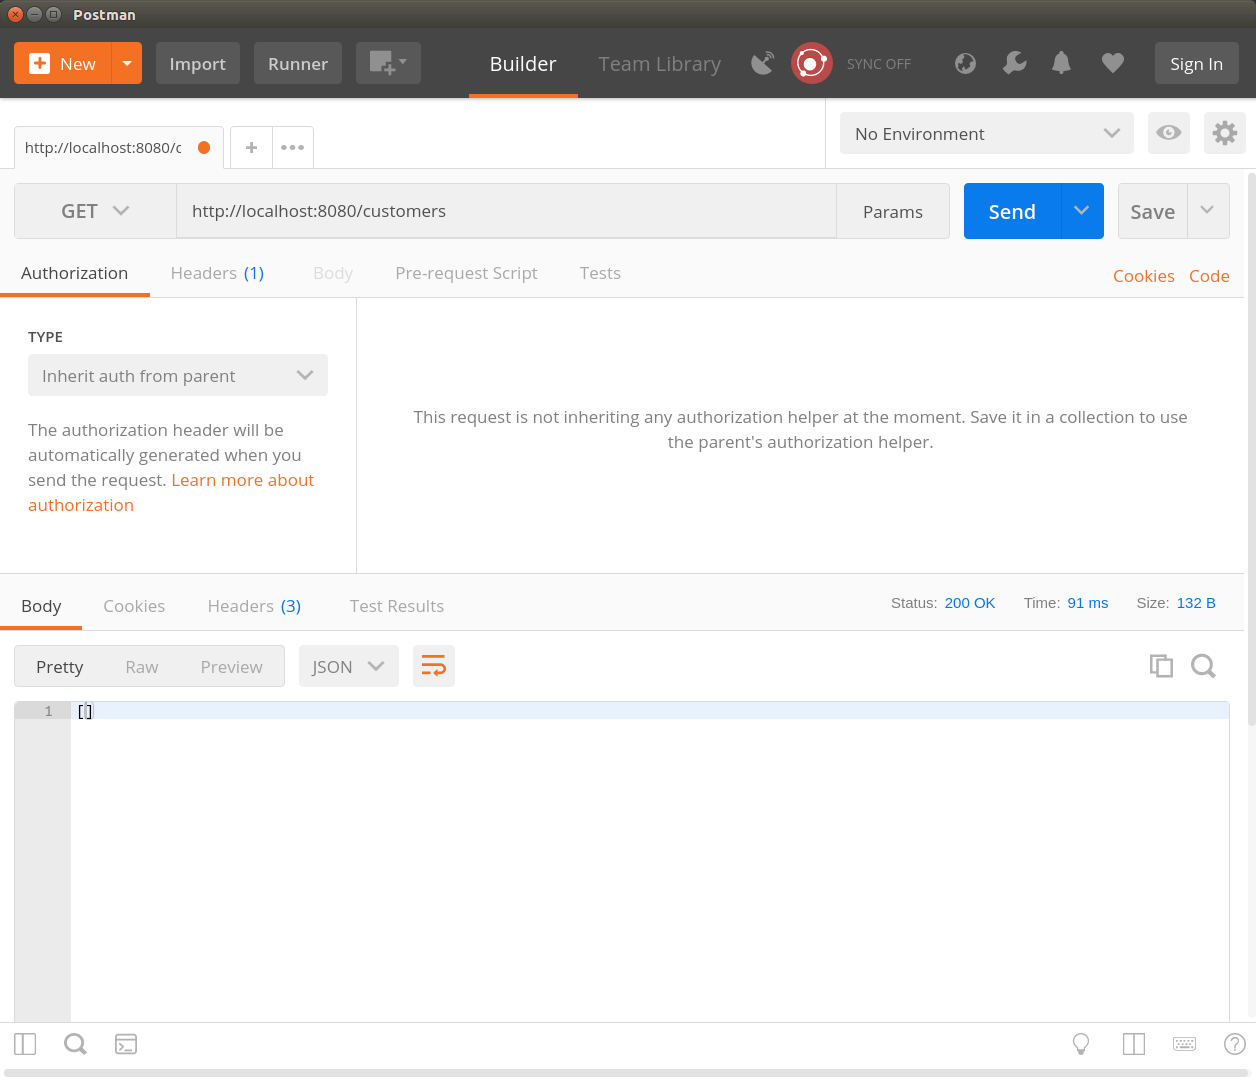
When calling the URL GET http://localhost:8080/customers we get an empty list. It is recommended to always return an empty list instead of a NULL or HTTP STATUS NOT_FOUND for GET methods that have a list as return value.
Now we call the Post method of our CustomerController with a RequestBody, which contains our customer data. Our body consists of a simple JSON object which contains a firstname and a lastname attribute.

We now see that our customer Albert Einstein has been created. The call of the POST method returns us in the status CREATED and as return value a customer object with an ID. Now we can start several calls against the POST method. With each call a new customer is created and stored in the static list.
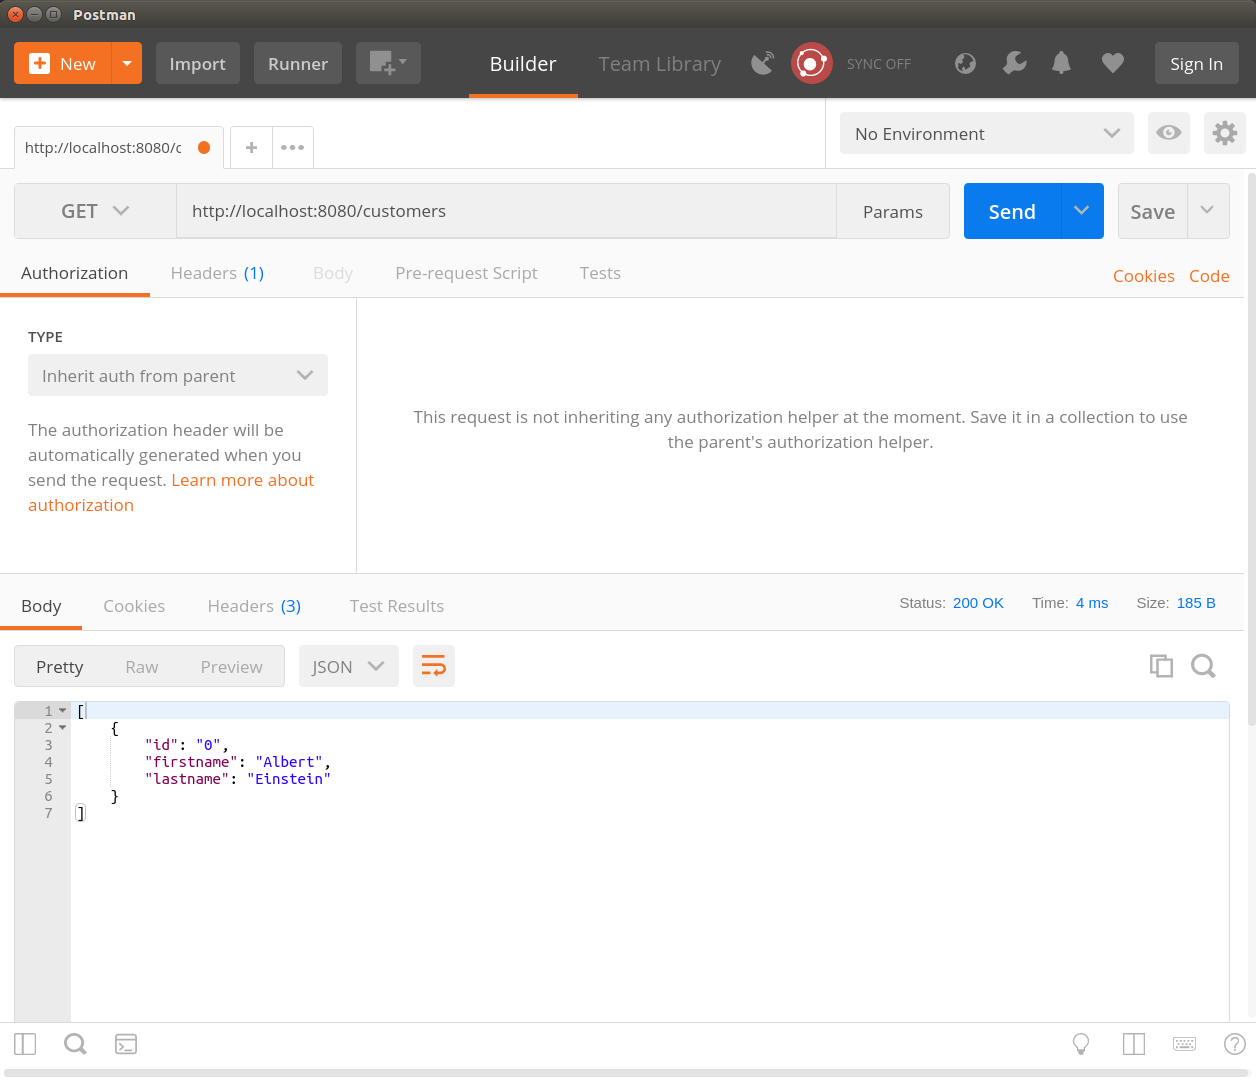
After saving the first customer, we can recall our first GET method, which returns all saved customers as a list.
Get Methode für das Holen von einem Object
Now all we need is the second GET method, which we can use to specifically search for individual customers. For this we will implement a new GET method, which returns customers according to the following URL scheme.
Example: http://localhost:8080/customers/0 -> supplies the customer with the ID 0
Example: http://localhost:8080/customers/1 -> supplies the customer with the ID 1
Implement Get Method
Our GET URL has the following scheme http://localhost:8080/customers/{id}
We see that we need a path variable here. As mentioned earlier in the tutorial, Spring Boot and Mapping Annotations can be used to further specify the URL’s of the methods. For the second GET method we need another Java method with the return value ResponseEntity<Customer> and an @GetMapping(„/{id}“).
package de.ertantoker.tutorial;

import org.springframework.http.HttpStatus;
import org.springframework.http.ResponseEntity;
import org.springframework.web.bind.annotation.*;

import java.util.ArrayList;
import java.util.List;

@RestController
@RequestMapping("/customers")
public class CustomerController {

    private static Integer customerId = 0;
    private static List<Customer> customers = new ArrayList<>();

    @GetMapping
    public ResponseEntity<List<Customer>> getCustomers() {
        return new ResponseEntity<>(customers, HttpStatus.OK);
    }

    @PostMapping
    public ResponseEntity<Customer> createCustomer(@RequestBody Customer customer) {
        customer.setId(String.valueOf(customerId++));
        customers.add(customer);
        return new ResponseEntity<>(customer, HttpStatus.CREATED);
    }

    @GetMapping("/{id}")
    public ResponseEntity<Customer> getCustomerById(@PathVariable String id) {
        return customers.stream()
                .filter(customer -> customer.getId().equals(id))
                .findFirst()
                .map(customer -> new ResponseEntity<>(customer, HttpStatus.OK))
                .orElseGet(() -> new ResponseEntity<>(HttpStatus.NOT_FOUND));
    }
}
Now the implementation for the GET method is finished. I won’t go into the details of the concrete Java 8 implementation of the method now. This would go beyond the scope of this tutorial. In short, the static list searches for the customer with the corresponding ID. If this is found, the customer is returned in the ResponseEntity Object. If no customer with the ID is found, a ResponseEntity with the HTTP status NOT_FOUND is returned.
So we would be done with the implementation of the rest controller. Of course you can extend the rest controller with further methods. The next tutorial will be about saving the data directly into a MongoDB via a repository class and loading it from there again.
The result
I hope you enjoyed this tutorial. If you have any questions, criticism or suggestions, please feel free to write them as a comment.