Spring Boot – Secure Microservice & Rest API with JWT & Spring Security
Introduction
Every programmer or software developer who develops a microserive asks himself the question: „How do I protect my microserive against unauthorized use?“ or „How do I make sure that my microservices can only be used by registered users? In this tutorial I will show you how to block your microservices or the rest of your API against unauthorized use. For this we will use Spring Boot, Spring Security and JWT. We will create two microservices where I will show you how to create a JWT token and how to use this JWT token to secure your microservices and rest APIs.
Requirements
- Rest Basics
- RestController Tutorial
- Spring Boot Basics
- Docker instance with MongoDB or local installation
A microservice that is not secured!
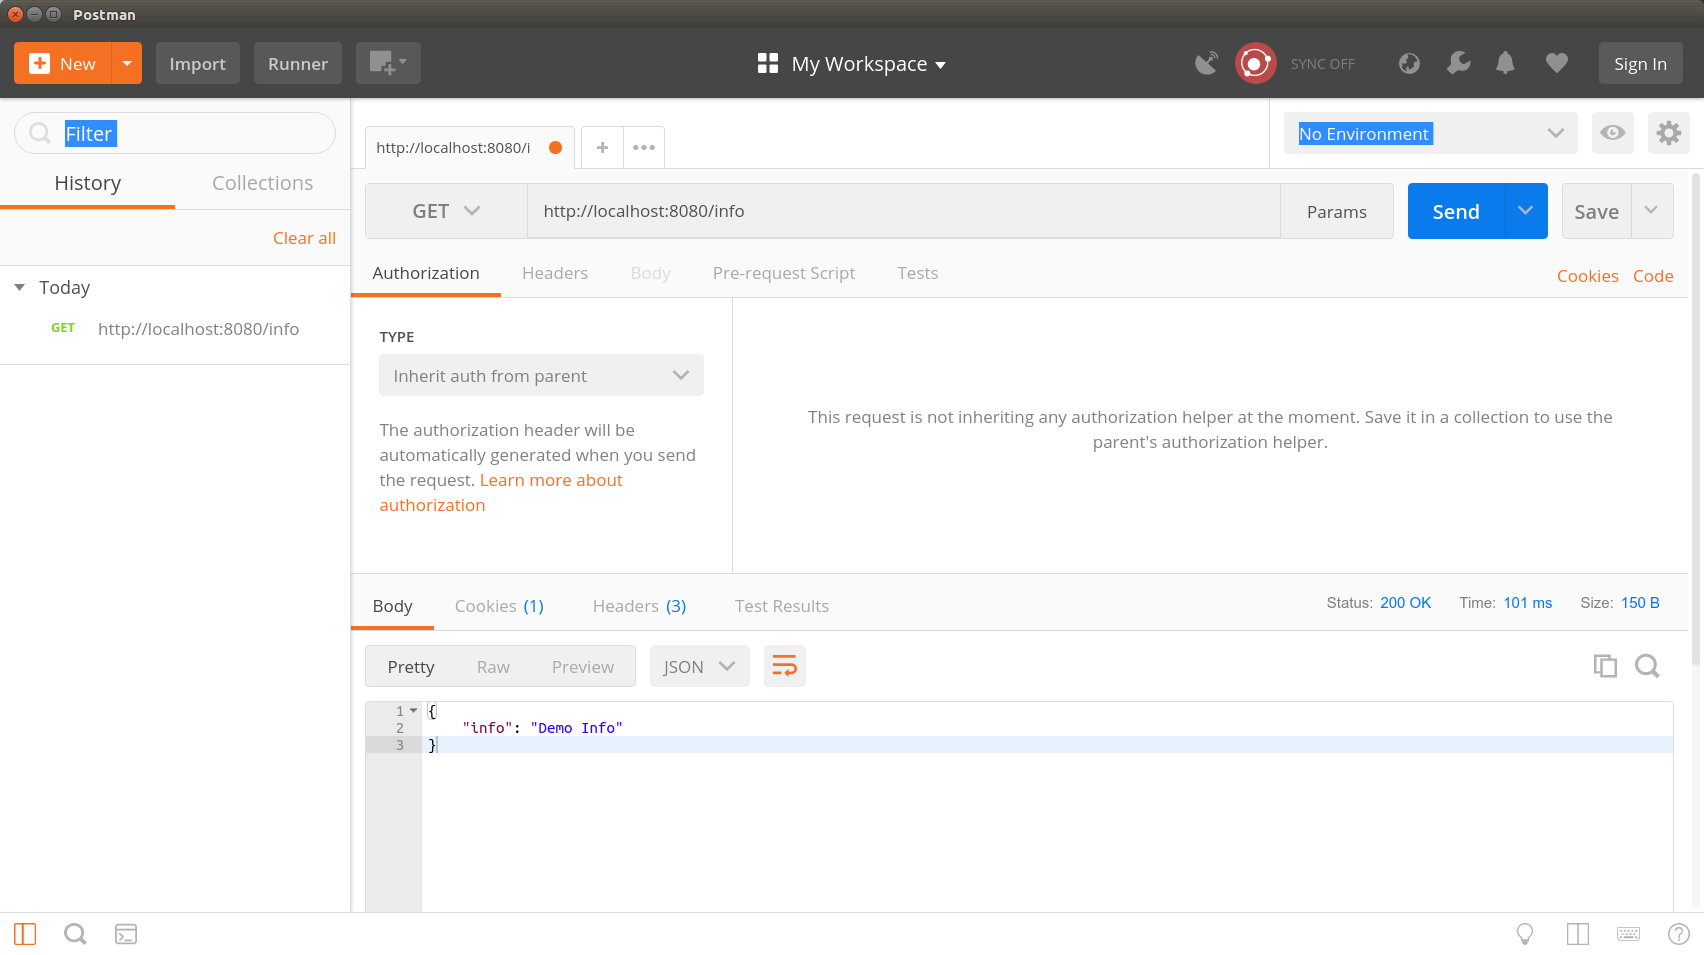
As a microservice example, we have an InfoService that returns an InfoResponse object that contains the current server time. For this purpose, we have a RestController that returns the InfoObject via the URL http://localhost:8080/info . The service is intentionally kept simple, since the tutorial is mainly about securing a microservice. How to create more extensive RestController you can read here in my tutorial „Spring Boot – Create RestController Classes„.
The following section shows a complete RestController that returns the InfoObject via the GET call from http://localhost:8080/info .
package de.ertantoker.tutorial;

import de.ertantoker.tutorial.response.InfoResponse;
import org.springframework.http.HttpStatus;
import org.springframework.http.ResponseEntity;
import org.springframework.web.bind.annotation.*;

@RestController
@RequestMapping("/info")
public class InfoController {

    @GetMapping
    public ResponseEntity getCustomers() {
        InfoResponse infoResponse = new InfoResponse();
        infoResponse.setInfo("Demo Info");
        return new ResponseEntity<>(infoResponse, HttpStatus.OK);
    }
}
With the tool Postman we can now call our rest API and see the following result.
What is a JWT Token?
We have now managed to consume the rest of our API. The problem here is that anyone can consume this API if the microservice were available on the Internet. This is exactly what we want to prevent with this tutorial. We have to make sure that our Microservice or the rest of our API recognizes from whom the request comes. For this we can use JWT tokens.
JWT stands for JSON Web Token. Basically, it is like a ticket or access card that the consumer of a microservice receives, with which he must identify himself when consuming a microservice. A JWT token is always created on the server side, signed and made available to the consumer.
How this works is explained below. When using a JWT token, it is important that the token is sent to the Microservice with every request. The microservice, in our case our InfoService, then validates the JWT token and decides whether it allows the HTTP request or not. You can compare the whole thing with the access card. Of course, an access card is not valid for eternity. At the latest, when you leave the company, the access card is taken away from an employee. This also applies to our JWT token. Our token will receive an „expiration date“. This date defines when our JWT token is no longer valid. It is important here that expired tokens are answered by the InfoService with HTTP status 401.
You can see how a JWT token is structured on the following Wikipedia page.
AuthenticationService
The AuthenticationService – The foundation for the security of our microservices
Now we know that we need a JWT token. The question now is: „How do we create a JWT token for ourselves“ that we can send to the client?
For this we will create a new Authentication Microservice. This has the task of creating a JWT token for the client via an HTTP post call. The URL for calling the AuthenticationService will look like this: http://localhost:8888/login. As you can see, this microservice is started with port 8888. If you would use the default port (8080) of Spring Boot, then the microservice you want to start second would not be started, because the port is already occupied.
As mentioned above, we will send an HTTP post call to our AuthenticationService. The reason why a POST call is explicitly sent here and not a GET is that GET requests from many HTTP servers like Apache Webserver or nginx are logged in the access.log. So you would write the password of the user who wants a JWT token into the access logs, which is an unnecessary security risk.
The following code section shows the complete RestController for the AuthenticationService:
package de.ertantoker.tutorial.controller;

import de.ertantoker.tutorial.exception.EntityNotFoundException;
import de.ertantoker.tutorial.request.AuthenticationRequest;
import de.ertantoker.tutorial.response.JWTTokenResponse;
import de.ertantoker.tutorial.service.AuthenticationService;
import org.springframework.http.HttpStatus;
import org.springframework.http.ResponseEntity;
import org.springframework.web.bind.annotation.*;

@RestController
@RequestMapping
public class AuthenticationController {

    private AuthenticationService authenticationService;

    public AuthenticationController(AuthenticationService authenticationService) {
        this.authenticationService = authenticationService;
    }

    @PostMapping("/login")
    public ResponseEntity createCustomer(@RequestBody AuthenticationRequest request) {
        return new ResponseEntity<>(authenticationService.generateJWTToken(request.getUsername(), request.getPassword()), HttpStatus.OK);
    }

    @ExceptionHandler(EntityNotFoundException.class)
    public ResponseEntity handleEntityNotFoundException(EntityNotFoundException ex) {
        return new ResponseEntity<>(ex.getMessage(), HttpStatus.NOT_FOUND);
    }
}
Our AuthenticationService is not yet implemented with a RestController. As you can see from the code example, the request is forwarded to the getJWTToken() method of the AuthenticationService.java class. In this method our JWT token is created and signed.
The following code section shows the complete AuthenticationService code:
package de.ertantoker.tutorial.service;

import de.ertantoker.tutorial.exception.EntityNotFoundException;
import de.ertantoker.tutorial.repository.AccountRepository;
import de.ertantoker.tutorial.response.JWTTokenResponse;
import org.springframework.security.crypto.password.PasswordEncoder;
import org.springframework.stereotype.Service;

@Service
public class AuthenticationService {

    private AccountRepository accountRepository;
    private JwtTokenService jwtTokenService;
    private PasswordEncoder passwordEncoder;

    public AuthenticationService(AccountRepository accountRepository, JwtTokenService jwtTokenService, PasswordEncoder passwordEncoder) {
        this.accountRepository = accountRepository;
        this.jwtTokenService = jwtTokenService;
        this.passwordEncoder = passwordEncoder;
    }

    public JWTTokenResponse generateJWTToken(String username, String password) {
        return accountRepository.findOneByUsername(username)
                .filter(account ->  passwordEncoder.matches(password, account.getPassword()))
                .map(account -> new JWTTokenResponse(jwtTokenService.generateToken(username)))
                .orElseThrow(() ->  new EntityNotFoundException("Account not found"));
    }
}
The implementation of the method shows us that you first use the AccountRepository to search for an account object in the database. How Spring Boot Repository interfaces work you can read in my tutorial „Spring Boot Repository„.
The method findOneByUsername returns an optional object as return value, which can either be empty or can contain an account object. On the optional object we can now call the filter method. Here we check whether the encrypted password is also the one that was transmitted. If the filter method returns a true, then we can pass the result to the JwtTokenService, which generates the JWTTokenResponse for us.
Note that the map method is only called here if the filter method returned a true. If the filter method returns a false, i.e. the passwords are not identical, then an EntityNotFoundException is thrown, which is intercepted by the parent AuthenticationController via the ExceptionHandler. The orElseThrow method is also called if the optional object contains an empty. So no account object could be found to the username.
After looking at the implementation in the AuthenticationService class, we now look at the class JwtTokenService.java. Here we focus on the method String generateToken(String username), which creates the token for us. I will not go into detail about the implementation here. The implementation is self-explanatory.
The following code section shows the complete JwtTokenService code:
package de.ertantoker.tutorial.service;

import io.jsonwebtoken.Jwts;
import io.jsonwebtoken.SignatureAlgorithm;
import org.springframework.beans.factory.annotation.Value;
import org.springframework.stereotype.Component;

import java.util.Date;
import java.util.HashMap;

@Component
public class JwtTokenService {

    private String secret;

    private Long expiration;

    public JwtTokenService(@Value("${jwt.secret}") String secret,
                           @Value("${jwt.expiration}") Long expiration) {
        this.secret = secret;
        this.expiration = expiration;
    }

    public String generateToken(String username) {
        final Date createdDate = new Date();
        final Date expirationDate = calculateExpirationDate(createdDate);

        return Jwts.builder()
                .setClaims(new HashMap<>())
                .setSubject(username)
                .setIssuedAt(createdDate)
                .setExpiration(expirationDate)
                .signWith(SignatureAlgorithm.HS512, secret)
                .compact();
    }

    private Date calculateExpirationDate(Date createdDate) {
        return new Date(createdDate.getTime() + expiration * 10000);
    }
}
Test AuthenticationService
Now we are done implementing the AuthenticationService! Now we will test our rest interface to see if it does exactly what we implemented.
Before you start the Spring Boot application, you should know that you need a running mongoDb installation or a MongoDB container on port 27017. The Spring Boot application is implemented so that a demo account with the values Username: DemoAccount and Password: DemoPassword is created when you start the application. The implementation can be found in the class ApplicationStartup.java.
Now that we have started our AuthenticationService Microservice, Postman sends me an HTTP post call to the URL: http://localhost:8888/login.
As BodyRequest we send the following JSON data:
{
	"username": "DemoAccount",
	"password": "DemoPassword"
}
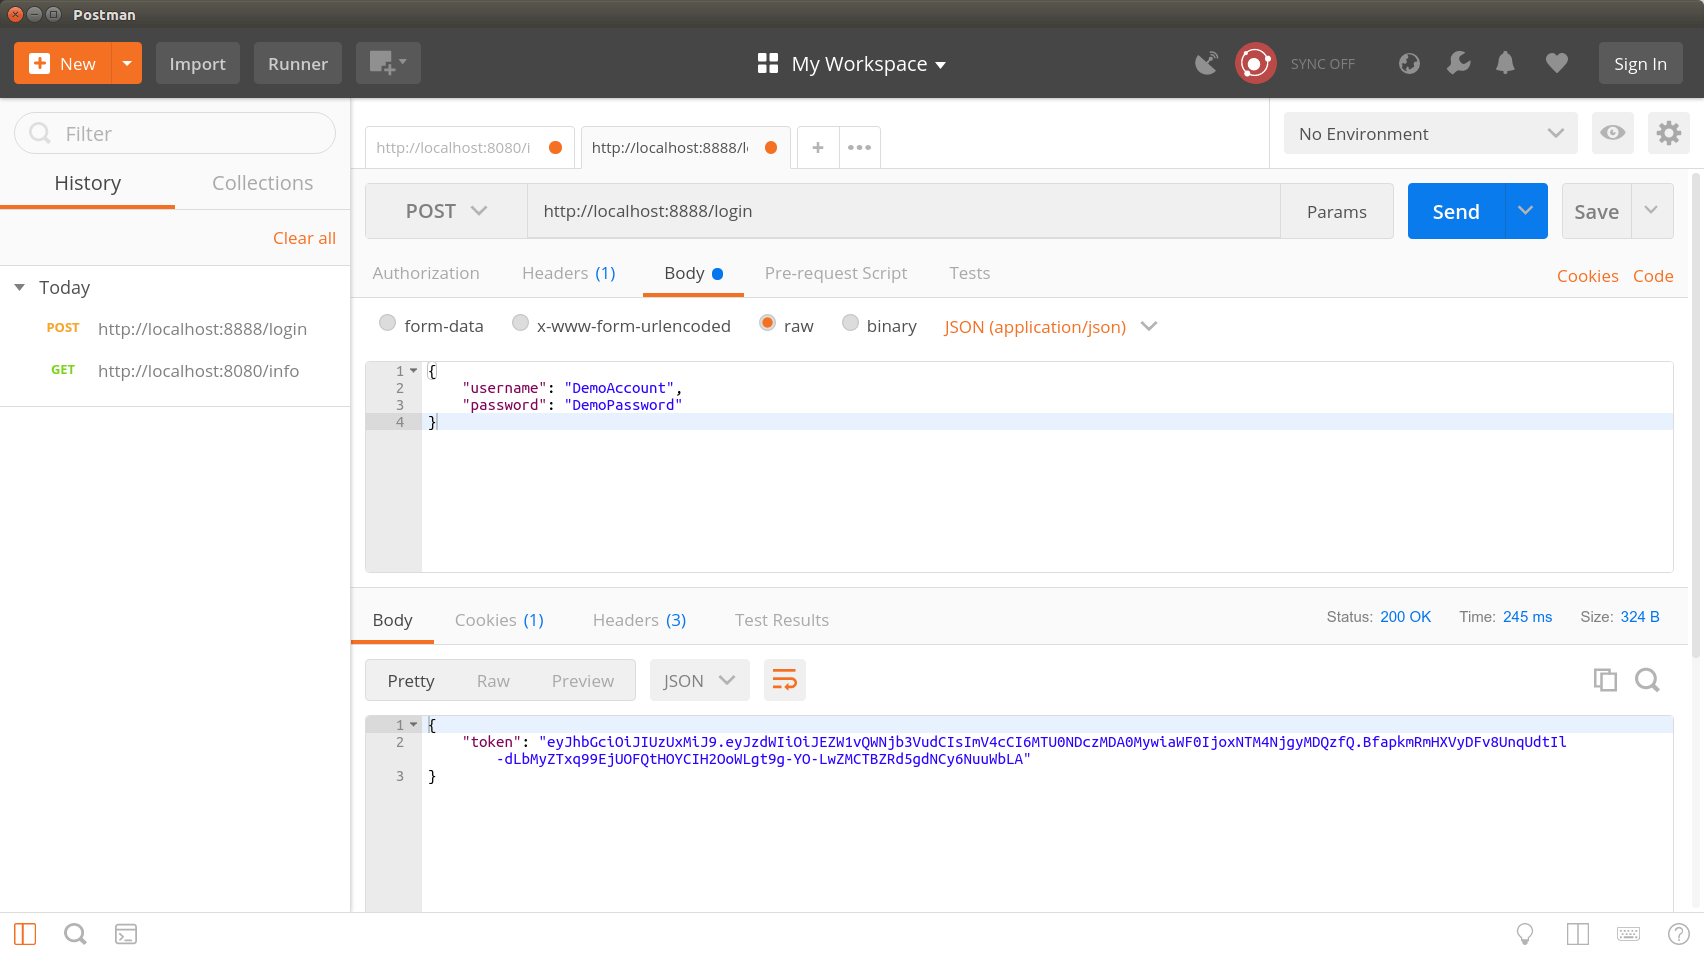
The picture open shows that we have received a JWT token. You can now check your token on the page https://jwt.io/ to see if it is valid. Please make sure that you need your secret to check if the signature of the token is correct. Your secret, which is stored in the application.yml, should not be given to anyone!
We should also test if our AuthenticationService also works if we enter a username which is not included in the MongoDB. For this we send a new request and change the username in the HTTP post request. Now we should get a HTTP status 404 as response code. You can also test it by changing the password. Also in this case we should get a HTTP status 404 as response code. I leave this test to you.
The secure InfoService
We have now completed the AuthenticationService. Now it is our turn to secure the InfoService with Spring Security. Spring Security is an independent Spring project which allows the developer to secure his Spring Boot application in the simplest way possible.
Extending the pom.xml file
The first step is to extend the pom.xml file. Here we have to include the dependency for Spring Security. After the integration Spring Security is directly active. This only happens because Spring Boot Security is configured by default so that the AutoConfiguration of Spring Boot loads the corresponding configurations.
The following code section shows the complete pom.xml file:
<project xmlns="http://maven.apache.org/POM/4.0.0" xmlns:xsi="http://www.w3.org/2001/XMLSchema-instance"
         xsi:schemaLocation="http://maven.apache.org/POM/4.0.0 http://maven.apache.org/maven-v4_0_0.xsd">
  <modelVersion>4.0.0</modelVersion>
  <groupId>de.ertantoker.tutorial</groupId>
  <artifactId>spring-boot-info-service</artifactId>
  <packaging>jar</packaging>
  <version>1.0-SNAPSHOT</version>
  <name>spring-boot-info-service</name>
  <url>http://maven.apache.org</url>

  <parent>
    <groupId>org.springframework.boot</groupId>
    <artifactId>spring-boot-starter-parent</artifactId>
    <version>2.0.4.RELEASE</version>
  </parent>

  <properties>
    <java.version>1.8</java.version>
  </properties>

  <dependencies>
    <dependency>
      <groupId>org.springframework.boot</groupId>
      <artifactId>spring-boot-starter-web</artifactId>
    </dependency>
    <dependency>
      <groupId>org.springframework.boot</groupId>
      <artifactId>spring-boot-starter-security</artifactId>
    </dependency>
    <dependency>
      <groupId>io.jsonwebtoken</groupId>
      <artifactId>jjwt</artifactId>
      <version>0.9.1</version>
    </dependency>
  </dependencies>

  <build>
    <plugins>
      <plugin>
        <groupId>org.springframework.boot</groupId>
        <artifactId>spring-boot-maven-plugin</artifactId>
      </plugin>
    </plugins>
  </build>
</project>
The Filter Class
Next we need a ServletFilter with which we can extract the JWT token from the HTTP request. In the class JwtAuthenticationTokenFilter.java we will take the JWT token from the Request Object and pass it to the SecurityContext of Spring Security. The transfer to the SecurityContext ensures that the token is evaluated by Spring Security.
The following code section shows the complete JwtAuthenticationTokenFilter.java file:
package de.ertantoker.tutorial.security;

import org.springframework.beans.factory.annotation.Value;
import org.springframework.security.core.context.SecurityContextHolder;
import org.springframework.stereotype.Component;
import org.springframework.web.filter.OncePerRequestFilter;

import javax.servlet.FilterChain;
import javax.servlet.ServletException;
import javax.servlet.http.HttpServletRequest;
import javax.servlet.http.HttpServletResponse;
import java.io.IOException;

@Component
public class JwtAuthenticationTokenFilter extends OncePerRequestFilter {

    @Value("${jwt.header}")
    private String tokenHeader;

    @Override
    protected void doFilterInternal(HttpServletRequest request, HttpServletResponse response, FilterChain chain) throws ServletException, IOException {
        final String requestHeader = request.getHeader(this.tokenHeader);

        if (requestHeader != null && requestHeader.startsWith("Bearer ")) {
            String  authToken = requestHeader.substring(7);
            JwtAuthentication authentication = new JwtAuthentication(authToken);
            SecurityContextHolder.getContext().setAuthentication(authentication);
        }
        chain.doFilter(request, response);
    }
}
The JwtAuthenticationEntryPoint Class
Next, we look at the class JwtAuthenticationEntryPoint.java. This is used to return an HTTP status code SC_UNAUTHORIZED for requests that are unauthorized.
The following code section shows the complete JwtAuthenticationEntryPoint.java file:
package de.ertantoker.tutorial.security;

import org.springframework.security.core.AuthenticationException;
import org.springframework.security.web.AuthenticationEntryPoint;
import org.springframework.stereotype.Component;

import javax.servlet.http.HttpServletRequest;
import javax.servlet.http.HttpServletResponse;
import java.io.IOException;
import java.io.Serializable;

@Component
public class JwtAuthenticationEntryPoint implements AuthenticationEntryPoint, Serializable {

    @Override
    public void commence(HttpServletRequest request, HttpServletResponse response,
                         AuthenticationException authException) throws IOException {
        response.sendError(HttpServletResponse.SC_UNAUTHORIZED, "Unauthorized");
    }
}
The JwtAuthenticationProvider Class
The actual check takes place in the method public Authentication authenticate(Authentication authentication) of the JwtAuthenticationProvider.java class. Here the token, which we extracted before in the JwtAuthenticationTokenFilter class, is evaluated. In addition, the username is extracted from the token and, if the token is valid, returned as a JwtAuthenticatedProfile.
Thus the JwtAuthenticatedProfile object is then available to the Spring SecurityContext and can be evaluated at a later time, at various places in the code, if one wants it.
If the token is not valid, a JwtAuthenticationException is thrown. Under certain circumstances it can happen that an HTTP request was sent, where a bearer token is contained in the header, but this token is not a real JWT token and therefore cannot be evaluated, then a JwtAuthenticationException is thrown as well.
The following code section shows the complete JwtAuthenticationProvider.java file:
package de.ertantoker.tutorial.security;

import io.jsonwebtoken.JwtException;
import org.slf4j.Logger;
import org.slf4j.LoggerFactory;
import org.springframework.beans.factory.annotation.Autowired;
import org.springframework.security.authentication.AuthenticationProvider;
import org.springframework.security.core.Authentication;
import org.springframework.security.core.AuthenticationException;
import org.springframework.stereotype.Component;

@Component
public class JwtAuthenticationProvider implements AuthenticationProvider {

    private static final Logger log = LoggerFactory.getLogger(JwtAuthenticationProvider.class);

    private final JwtTokenService jwtService;

    @SuppressWarnings("unused")
    public JwtAuthenticationProvider() {
        this(null);
    }

    @Autowired
    public JwtAuthenticationProvider(JwtTokenService jwtService) {
        this.jwtService = jwtService;
    }

    @Override
    public Authentication authenticate(Authentication authentication) throws AuthenticationException {

        try {
            String token = (String) authentication.getCredentials();
            String username = jwtService.getUsernameFromToken(token);

            return jwtService.validateToken(token)
                    .map(aBoolean -> new JwtAuthenticatedProfile(username))
                    .orElseThrow(() -> new JwtAuthenticationException("JWT Token validation failed"));

        } catch (JwtException ex) {
            log.error(String.format("Invalid JWT Token: %s", ex.getMessage()));
            throw new JwtAuthenticationException("Failed to verify token");
        }
    }

    @Override
    public boolean supports(Class<?> authentication) {
        return JwtAuthentication.class.equals(authentication);
    }
}
The WebService Security Config Class
Finally only the Spring Security Config has to be adapted to the own application. For this we write our own Config class with the name WebSecurityConfig.java. In this configuration class all security related configurations are made.
In our example we don’t have a URL that we don’t want to secure. Every URL offered from Spring Boot is secured.
The following code section shows the complete WebSecurityConfig.java file:
package de.ertantoker.tutorial.config;

import de.ertantoker.tutorial.security.JwtAuthenticationEntryPoint;
import de.ertantoker.tutorial.security.JwtAuthenticationProvider;
import de.ertantoker.tutorial.security.JwtAuthenticationTokenFilter;
import org.springframework.beans.factory.annotation.Autowired;
import org.springframework.context.annotation.Bean;
import org.springframework.context.annotation.Configuration;
import org.springframework.security.config.annotation.authentication.builders.AuthenticationManagerBuilder;
import org.springframework.security.config.annotation.web.builders.HttpSecurity;
import org.springframework.security.config.annotation.web.configuration.EnableWebSecurity;
import org.springframework.security.config.annotation.web.configuration.WebSecurityConfigurerAdapter;
import org.springframework.security.config.http.SessionCreationPolicy;
import org.springframework.security.web.authentication.UsernamePasswordAuthenticationFilter;


@SuppressWarnings("SpringJavaAutowiringInspection")
@Configuration
@EnableWebSecurity
public class WebSecurityConfig extends WebSecurityConfigurerAdapter {

    @Autowired
    private JwtAuthenticationEntryPoint unauthorizedHandler;

    @Autowired
    private JwtAuthenticationProvider jwtAuthenticationProvider;

    @Autowired
    public void configureAuthentication(AuthenticationManagerBuilder authenticationManagerBuilder) {
        authenticationManagerBuilder.authenticationProvider(jwtAuthenticationProvider);
    }

    @Bean
    public JwtAuthenticationTokenFilter authenticationTokenFilterBean() {
        return new JwtAuthenticationTokenFilter();
    }

    @Override
    protected void configure(HttpSecurity httpSecurity) throws Exception {
        httpSecurity
                .csrf().disable()
                .exceptionHandling().authenticationEntryPoint(unauthorizedHandler).and()
                .sessionManagement().sessionCreationPolicy(SessionCreationPolicy.STATELESS).and()
                .authorizeRequests()
                .anyRequest().authenticated();

        httpSecurity.addFilterBefore(authenticationTokenFilterBean(), UsernamePasswordAuthenticationFilter.class);
        httpSecurity.headers().cacheControl();
    }
}
Testing InfoService Rest API with a JWT Token
Now that everything is implemented and the Spring Security Config is activated by the @EnableWebSecurity annotation, we restart our two microservices. As you have seen, we have not changed anything about the implementation of the InfoController.
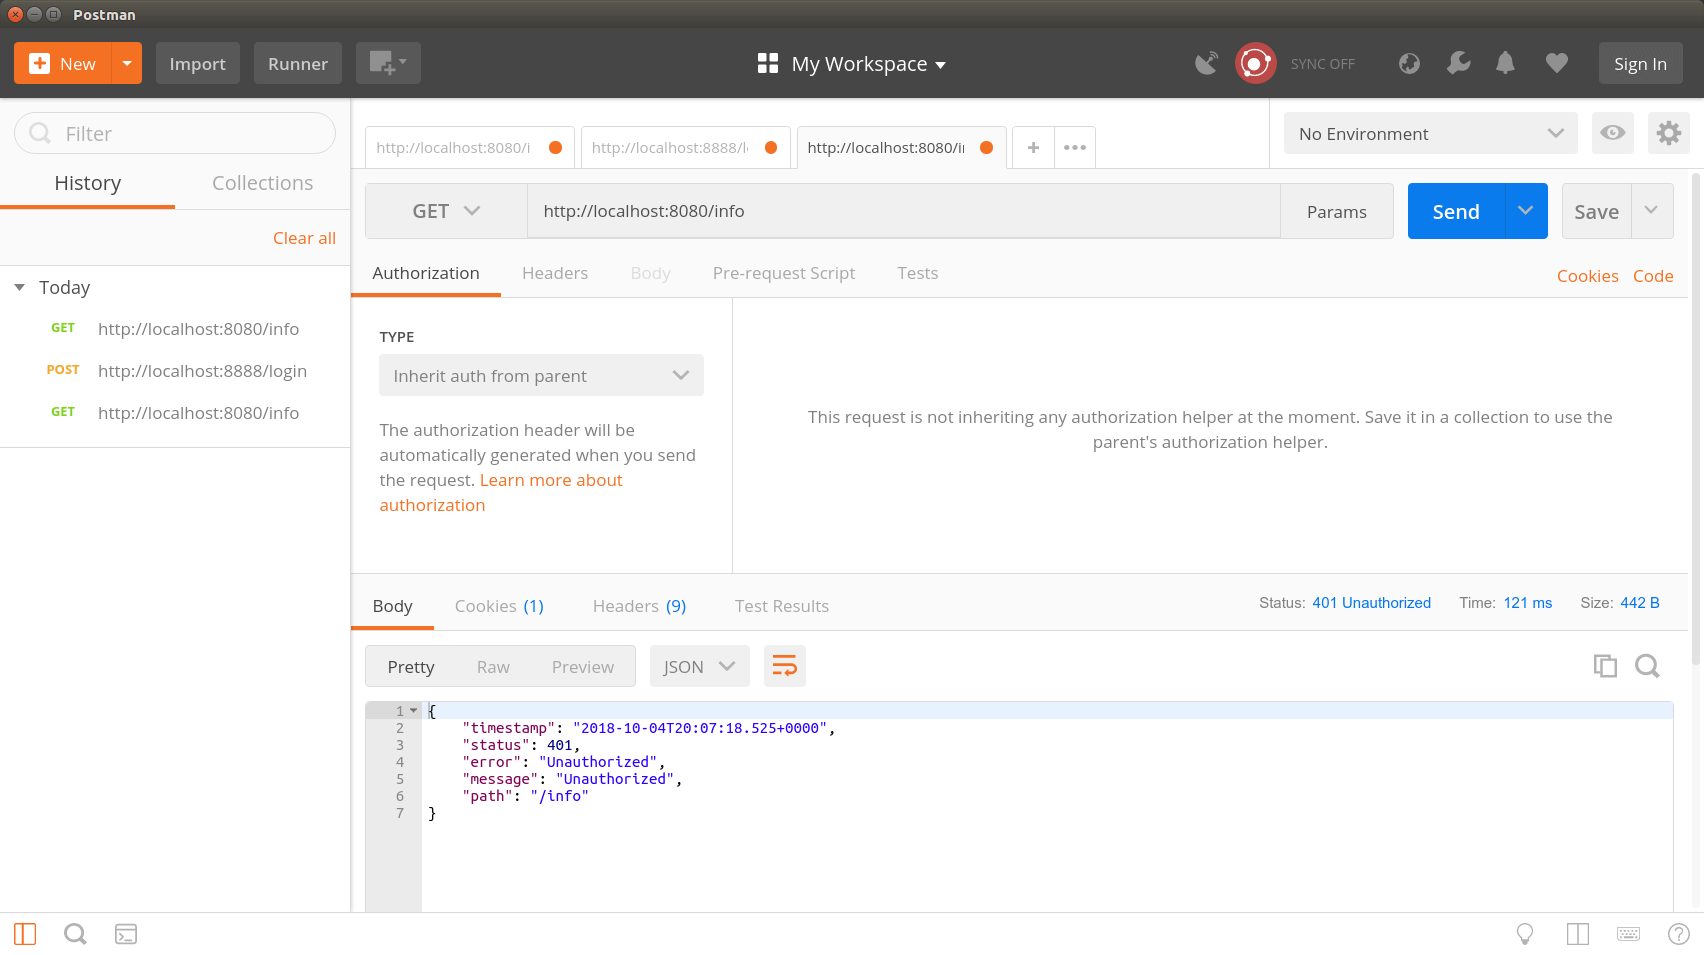
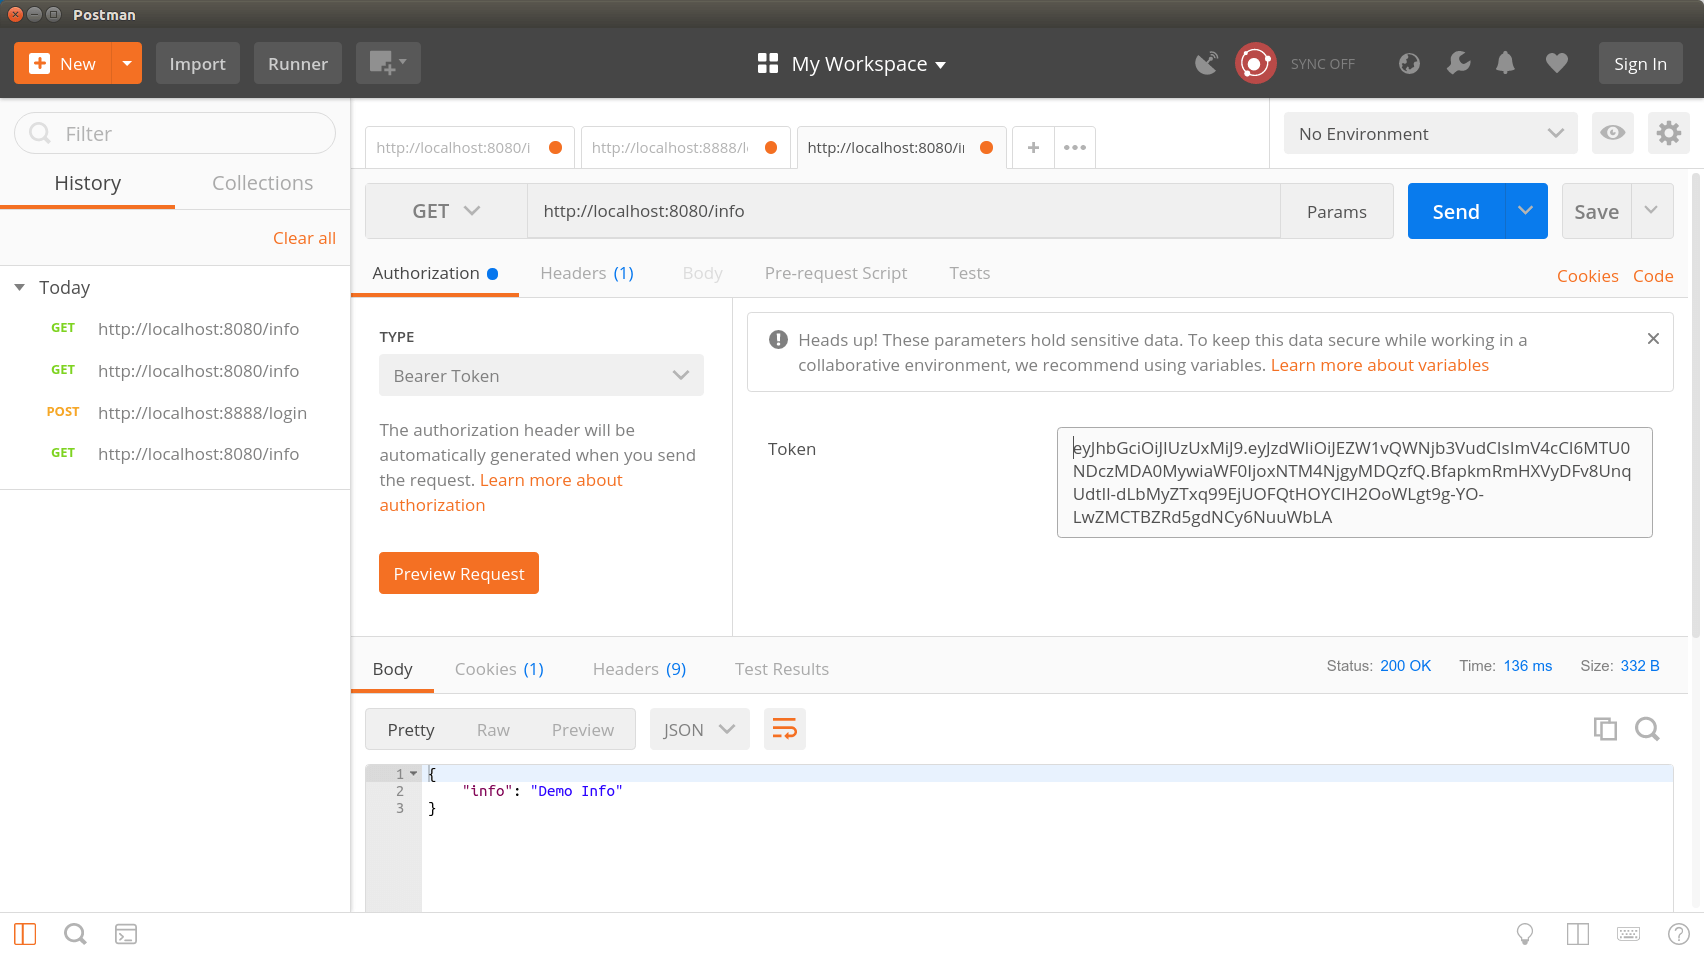
Now the rest of our API is secured against unauthorized use. However, we should still test whether requests that have a valid token are also properly answered by our microservice. For this we use a valid JWT token for our HTTP GET request for the Bearer Authorization Header. Now we start the request again and see that this time the request returns a HTTP status code 200 and an InfoResponse object.
The result
In this tutorial, we learned how to implement an AuthenticationServer that returns a JWT token that we can use for further requests against our secured services. Thanks to Spring Security, we have secured our MicroServices so that the rest of the API can only be called with a valid JWT token.
The principle with the JWT token is not really 100% secure in this form! If you now send your requests via HTTP and not via an encrypted connection like HTTPS, then it is very easy for an attacker to access the JWT token. You should implement your client application in such a way that the JWT token is also stored securely.
The JWT token is like a key of a house. If the key is lost or stolen, you have to have a new key made or change the lock. This also applies to our JWT Token. If the token should fall into the wrong hands, it is imperative that the secret (application.yml) is exchanged at both microservices.
Another possibility is to keep the ExpireDate of the JWT token as low as possible. This would cause the stolen JWT token to become invalid in a very short time.
The complete source code for the tutorial can be found on my GitLab page
I hope you enjoyed my tutorial. If you have any questions, criticism or suggestions, please write a comment below.


This is an amazing tutorial , thank you so much for this tutorial. However i was wondering is it possible to separate the INFOSERVICE and the AUTHSERVICE. In most cases you wouldn’t want to couple different microservices in one big package/ module. In that case how can i separate the two microservices and also how can i use postgres instead of mongoDB.
@ KO. I’m going to implement this tutorial with Postgres. I will show you once im done.
#WIGIWAR