Spring Boot – Create Spring Boot projects with Apache Maven
Einleitung
In this tutorial I would like to show you how to create a Spring Boot project with Apache Maven. With Spring Boot and Apache Maven it is possible to create microservices in shortest time! This tutorial will be the beginning for further tutorials I will write. There will be a series of Spring Boot and Spring Cloud tutorials. This Spring Boot Tutorial will be the basis for the other tutorials.
Requirement
Create Java Project with Apache Maven
By entering the following command in the Linux or Windows Console you create an empty Maven Project!
mvn archetype:generate -DgroupId=de.ertantoker.tutorial -DartifactId=spring-boot-with-maven -DarchetypeArtifactId=maven-archetype-quickstart -DinteractiveMode=false
When creating a Maven project, it is important to adjust the parameters „-DgroupId“ and „-DartifactId“ to your own project needs. I have entered exemplarily „de.ertantoker.tutorial“ and „spring-boot-with-maven“.
After the project is created a directory with the name of the „artifactId“ appears in the same folder, which you entered before. In my case the name of the directory is „spring-boot-with-maven“. The directory contains a file named „pom.xml“ and a directory named „src“. Here are all source code files!

Create Spring Boot Project
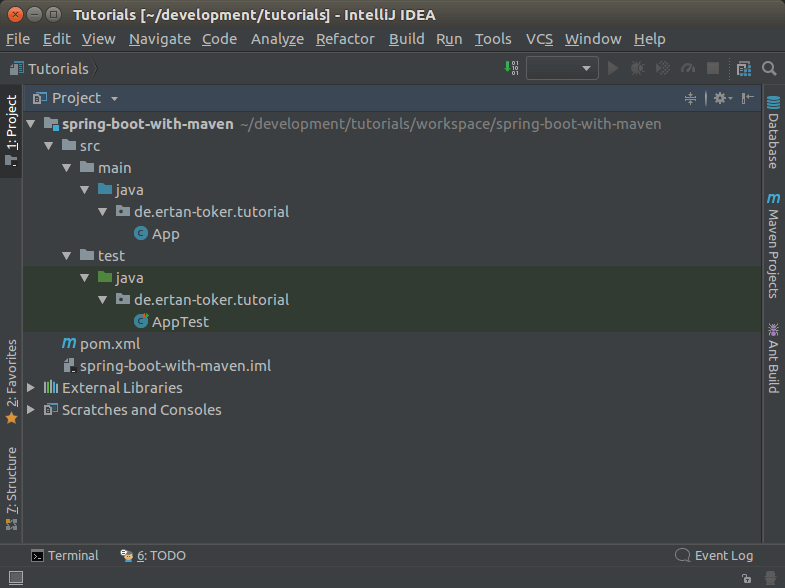
Now you can open the newly created project in a source code editor of your choice. I will use IntelliJ from Idea in my tutorials.
The project now has the following directory structure.
Customize Maven pom.xml file
To include Spring Boot in your projects we need to make some changes to the generated „pom.xml“. The POM file is the central configuration file for Maven projects.
In its current form, the pom.xml looks like this:
<project xmlns="http://maven.apache.org/POM/4.0.0" xmlns:xsi="http://www.w3.org/2001/XMLSchema-instance"
  xsi:schemaLocation="http://maven.apache.org/POM/4.0.0 http://maven.apache.org/maven-v4_0_0.xsd">
  <modelVersion>4.0.0</modelVersion>
  <groupId>de.ertantoker.tutorial</groupId>
  <artifactId>spring-boot-with-maven</artifactId>
  <packaging>jar</packaging>
  <version>1.0-SNAPSHOT</version>
  <name>spring-boot-with-maven</name>
  <url>http://maven.apache.org</url>
  <dependencies>
    <dependency>
      <groupId>junit</groupId>
      <artifactId>junit</artifactId>
      <version>3.8.1</version>
      <scope>test</scope>
    </dependency>
  </dependencies>
</project>
Include Spring Boot libraries
Embedding Spring Boot is quite simple. First the „pom.xml“ must be extended so that it becomes an extension of the Spring Boot Parent. The following changes have to be made to the pom.xml:
<project xmlns="http://maven.apache.org/POM/4.0.0" xmlns:xsi="http://www.w3.org/2001/XMLSchema-instance"
  xsi:schemaLocation="http://maven.apache.org/POM/4.0.0 http://maven.apache.org/maven-v4_0_0.xsd">
  <modelVersion>4.0.0</modelVersion>
  <groupId>de.ertantoker.tutorial</groupId>
  <artifactId>spring-boot-with-maven</artifactId>
  <packaging>jar</packaging>
  <version>1.0-SNAPSHOT</version>
  <name>spring-boot-with-maven</name>
  <url>http://maven.apache.org</url>

  <parent>
    <groupId>org.springframework.boot</groupId>
    <artifactId>spring-boot-starter-parent</artifactId>
    <version>2.0.1.RELEASE</version>
  </parent>

  <properties>
    <java.version>1.8</java.version>
  </properties>

  <dependencies>
    <dependency>
      <groupId>org.springframework.boot</groupId>
      <artifactId>spring-boot-starter-web</artifactId>
    </dependency>

    <dependency>
      <groupId>junit</groupId>
      <artifactId>junit</artifactId>
      <version>3.8.1</version>
      <scope>test</scope>
    </dependency>
  </dependencies>

  <build>
    <plugins>
      <plugin>
        <groupId>org.springframework.boot</groupId>
        <artifactId>spring-boot-maven-plugin</artifactId>
      </plugin>
    </plugins>
  </build>
</project>
Activate Spring Boot in Java project
By generating the project via Maven, we also automatically created an App.java class. This class is quite simple in the current version and offers no special function. To turn a Java application into a Spring Boot application you need a special Spring Boot Annotation and a code in the main method of the App.java class.
package de.ertantoker.tutorial;

import org.springframework.boot.SpringApplication;
import org.springframework.boot.autoconfigure.SpringBootApplication;

/**
 * Hello world!
 *
 */
@SpringBootApplication
public class App
{
    public static void main( String[] args )
    {
        SpringApplication.run(App.class, args);
    }
}
The @SpringBootApplication annotation configures the application to a Spring Boot application. This is mandatory. The line of code „SpringApplication.run(App.class, args);“ is used to automatically start a Spring Boot application when the Java application is started.
Test Spring Boot Project
If we have done everything right we can check it with a short test on the console. Enter the following command in the console:
mvn clean install
Now Maven starts to compile and build the application. At the end a new directory named „target“ appears. Only the Spring Boot application with the name „spring-boot-with-maven-1.0-SNAPSHOT.jar“ is located here. Now change to the directory „target“ and start the Spring Boot application with the following command:
java -jar spring-boot-with-maven-1.0-SNAPSHOT.jar
Now the Spring Boot application is started. Please make sure that a JDK version 1.8 (Java 8) is installed on your system. It should also be mentioned that Spring Boot always starts on port 8080 by default. This port should not be occupied by you. If yes you have to close the application which uses this port. Alternatively you can use a configuration file (application.yml) to tell Spring Boot to start the application on a different port, I will show you how to do this in one of the next tutorials.
The Spring Boot application is now started. We can see this from the last line: „2018-04-24 18:01:58.992 INFO 26292 — [ main] en.ertantoker.tutorial.App : Started App in 1.899 seconds (JVM running for 2.278)“.

The result
After the Spring Boot application has started it does not offer any real functionalities or methods, so we will add a RestController to the Spring Boot application in the next tutorial!
I hope you enjoyed my little introductory tutorial into the Spring Boot world. If you have any questions, criticism or suggestions, please feel free to comment on the tutorial.